1. Code Style
For all code that you write during this class (assignments, labs, etc.) you are expected to follow the Google Java Style Guide.
There are publicly available IDE configurations that you can use to import in your IDE. These configuration will attempt to format and style your Java code according to the Google Java Style Guide. The configuration files for Java, as well as other languages, can be found in the Google Styleguide repo on GitHub.
1.1. Eclipse
-
Download the Eclipse specific configuration file.
-
If Github is down download the file here.
-
-
Start Eclipse on your machine.
-
Go to your Eclipse Preferences menu.
-
On a Mac press Command+,.
-
On Windows go to Window and then Preferences.
-
-
On the left-hand side pane navigate to Java → Code Style → Formatter.
-
On the right-hand side pane click on Import…; a file explorer window pops up.
-
Navigate to the location that you used to save the downloaded file from step 1 above.
-
Click OK.
-
If a pop up message comes up from Eclipse mentioning something about the file being created by an older or newer version of Eclipse, click ok.
-
-
Click Apply.
-
Go back to the left-hand side panel and navigate to Java → Editor → Save Actions.
-
On the right-hand side pane check the following check boxes
-
Perform the selected actions on save.
-
Format source code.
-
Format all lines.
-
Organize imports.
-
Additional actions.
-
-
Once you select Additional actions the button Configure… located close to the right-edge of the current window will be enabled. Click it. A new window appears with 5 tabs Code Organization,Code Style,Member Access,Missing Code and Unnecessary Code.
-
Click on Code Organization and make sure you check the following checkboxes.
-
Remove trailing whitespace.
-
All lines.
-
Correct indentation.
-
-
Click on Code Style and make sure you check the following checkboxes.
-
Use blocks in if/while/for/do statements.
-
Always.
-
Use parenthesis in expression.
-
Always.
-
-
Click on Member Access and make sure you check the following checkboxes.
-
Use 'this' qualifier for field access.
-
Always.
-
Use declaring class as qualifier.
-
Qualify field accesses.
-
Qualify method accesses.
-
Change all accesses through subtypes.
-
Change all accesses through instances.
-
-
Click on Missing Code and make sure all checkboxes are selected.
-
Click on Unnecessary Code and make you check the following checkboxes.
-
Remove unused imports.
-
-
Click on OK located in the bottom right-hand corner of the current window. This should take you back to the Preference menu.
-
Click on OK location in the bottom right-habnd corner of the current window.
1.2. IntelliJ
-
Downlaod the IntelliJ specific configuration file.
-
Follow these instructions to install the file in IntelliJ.
The staff has not attempted these steps for IntelliJ. Try them out during the lab. If you face any issues we’ll try and help during the lab.
2. Recursion: Binary Trees
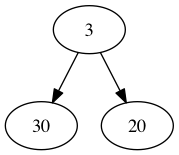
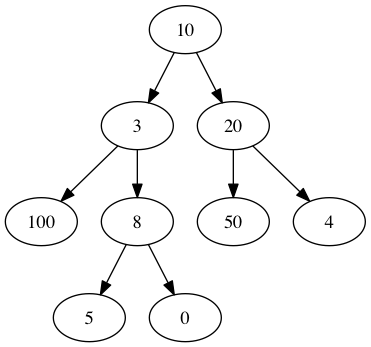
An Integer BinaryTree (IBT) comprises of a leaf or a node. Both a leaf and a node contain an integer value. A node however also contains two sub trees called the left and the right subtree.
Here are some examples of IBTs
| Leaf example | Node example | Node example |
|---|---|---|

|

|

|
We would like to pretty print our IBTs using the following rules
-
For a leaf print out the integer stored at that leaf.
-
For a node.
-
Print a left parenthesis first.
-
Print its left-subtree.
-
Print the integer stored at this node.
-
Print the right subtree.
-
Print a right parenthesis.
-
The table below shows how the IBTs from above get printed out
Pretty print Leaf example |
Pretty print Node example |
Pretty print Node example |
3 |
(30320) |
((1003(580))10(50204)) |
The IBTs as described thus far create nodes that must have 2 subtrees. We would like to extend out IBTs to allow for two new kinds of nodes
-
A left only node contains an integer and a left subtree only.
-
A right only node contains an integer and a right subtree only.
3. ADTs
We would like to design a program that implements an Association List (AList). An AList contains pairs as elements. We will use {< >} to represent an empty AList and (k,v) to represent a pair.
-
The first element of the pair
kis called a key. -
the second element of the pair
vis called a value.
So an AList holds key-value pairs. We would like to create an AList that has Point s (from Lab2) as keys and Shape s (from Lab2) as values.
Here is a table of the operations along with their specifications and comments.
| Operation | Specification | Comments |
|---|---|---|
|
|
|
|
{<>}.isEmpty()                    = true

{<(k,v), (k1,v1), ...>}.isEmpty() = false
|
|
|
{<>}.size()                    = 0

{<(k,v), (k1,v1), ...>}.size() =
    1 + {<{k1,v1,...>}.size()
|
|
|
{<>}.add(a,b)                    = {<(a,b)>}

{<(k,v), (k1,v1), ...>}.add(a,b) =
    {<(a,b), (k,v), (k1,v1),...>}
|
|
|
{<>}.replace(a,b)                    = {<>}

{<(a,c), (k1,v1), ...>}.replace(a,b) =
    {<(a,b),(k1,v1),...>}

{<(x,c), (k1,v1), ...>}.replace(a,b) =
    {(k1,v1),...>}.replace(a,b).add(x,c)
|
|
|
{<>}.delete(x)                    = {<>}

{<(x,v), (k1,v1), ...>}.delete(x) =
    {<(k1,v1), ...>}

{<(y,v), (k1,v1), ...>}.delete(x) =
    {<(k1,v1), ...>}.delete(x).add(y,v)
|
|
|
{<>}.has(x)                    = false

{<(x,v), (k1,v1), ...>}.has(x) = true

{<(y,v), (k1,v1), ...>}.has(x) =
    {<(k1,v1), ...>}.has(x)
|
|
|
{<>}.get(x)                    = ERROR

{<(x,v), (k1,v1), ...>}.get(x) = v

{<(y,v), (k1,v1), ...>}.get(x) =
    {<(k1,v1), ...>}.get(x)
|
|